
Apr
why you’ll love this table mat?
this checkered crochet table mat is not just a decorative piece – it’s a practical and stylish
way to protect your table from heat, scratches, and spills. Need a bigger size? Simply adjust
the pattern to create a laptop mat, desk pad, or even a placemat set! Whether you’re a
beginner or an experienced crocheter, this easy-to-follow pattern will help you create
something both functional and cute.
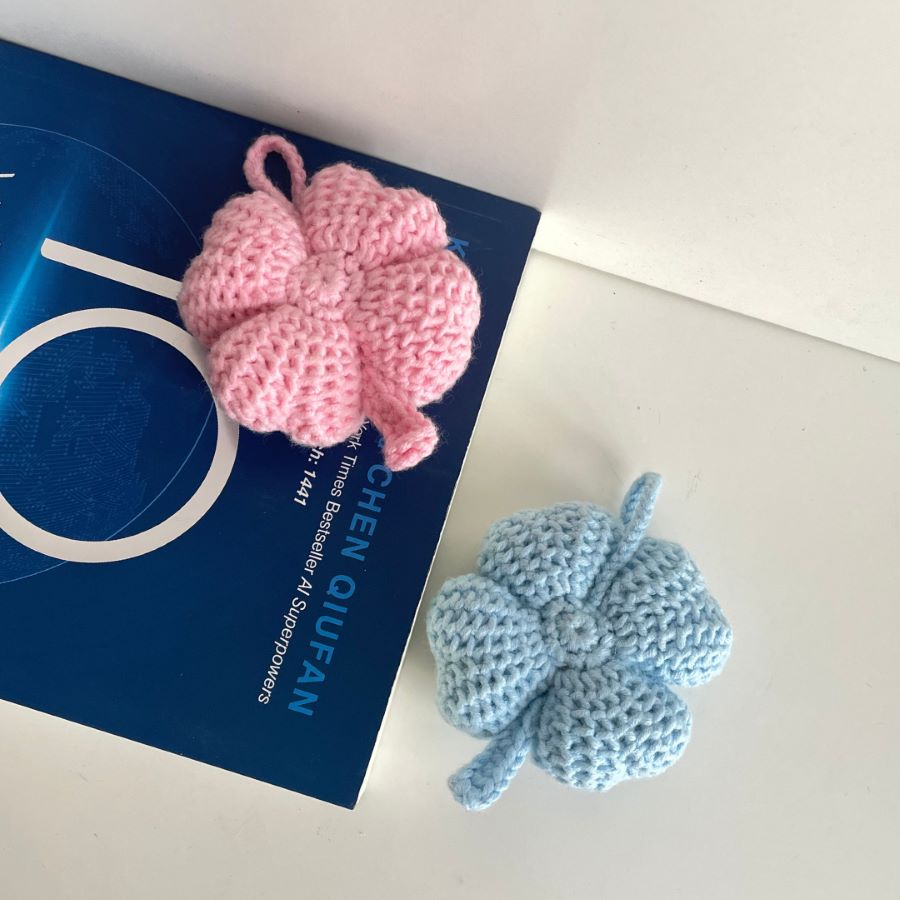
HOW TO CROCHET A LUCKY FOUR-LEAF CLOVER – BEGINNER-FRIENDLY
- min
- apr, 08, 2024
Table of content
1. Introducing
Are you looking for a meaningful and unique crochet project? Our Lucky Four-Leaf Clover Crochet Pattern is the perfect way to create a special handmade gift for your loved ones. Why Do You Love This Pattern?
A Symbol of Luck & Love – The four-leaf clover has long been known as a sign of good fortune. Crocheting one for your friends or family makes a thoughtful and heartwarming gift.
Bigger & More Detailed Design – Unlike traditional small clover appliqués, this pattern is designed to be larger and more structured, making it ideal for display or practical use.
Beginner-Friendly & Quick to Make – Whether you are new to crochet or an experienced crafter, this pattern is easy to follow, allowing you to create a stunning piece in no time!
2. Materials
- Yarn: yarnart jeans plus (55% cotton – 45% Acrylic), 50g (1.76 oz), 160 m (174 yds), one ball in colors 36.
- Hook: 2.5mm, 3mm (recommended hooks 2.5 – 3.5 mm)
- Needle
- Scissors
- Keyring loop
|
Slst |
Slip stitch |
|
Sc |
Single crochet |
|
Inc |
Increase |
|
Hdc |
Half double crochet |
|
Dc |
Double crochet |
|
Tr |
Tr double crochet |
|
Back Bump |
Slip Stitch into the Back Bump |
3. Crochet Pattern
Part 1: Center of the Clover
R1: MR 8sc.
R2: (sc, inc)4 (12).
1 slst to end R2.
Don’t cut the yarn.
Part 2: Leaf of the Clover (4)
R3 (there are 8 rows in one leaf):
r1: ch 6, insert hook into the back bump of each of the next 6 chains one by one, pulling up a loop in each (you will have 7 loops on the hook).
Insert the hook into the first stitch and pull up a loop, yarn over and pull through two loops at a time until the end.
r2: insert hook into the back bump of each of the next 7 chains one by one, pulling up a loop in each (you will have 8 loops on the hook).
Insert the hook into the first stitch and pull up a loop, yarn over and pull through two loops at a time until the end.
r3: insert hook into the back bump of each of the next 7 chains one by one, pulling up a loop in each (you will have 8 loops on the hook).
Insert the hook into the first stitch and pull up a loop, yarn over and pull through two loops at a time until the end.
r4: skip 1 stitch, insert hook into the back bump of each of the next 6 chains one by one, pulling up a loop in each (you will have 7 loops on the hook).
Insert the hook into the second stitch and pull up a loop, yarn over and pull through two loops at a time until the end.
r5: slst into the next 2 stitches (slst to create a leaf indentation).
Chain 2, insert hook into the back bump of each of the next 6 chains one by one, pulling up a loop in each (you will have 7 loops on the hook).
Insert the hook into the second stitch and pull up a loop, yarn over and pull through two loops at a time until the end.
r6: Chain 1, insert hook into the back bump of each of the next 7 chains one by one, pulling up a loop in each (you will have 8 loops on the hook).
Insert the hook into the third stitch and pull up a loop, yarn over and pull through two loops at a time until the end.
r7: insert hook into the back bump of each of the next 7 chains one by one, pulling up a loop in each (you will have 8 loops on the hook).
Insert the hook into the third stitch and pull up a loop, yarn over and pull through two loops at a time until the end.
r8: skip 1 stitch, insert hook into the back bump of each of the next 6 chains one by one, pulling up a loop in each (you will have 7 loops on the hook).
Insert the hook into the third stitch and pull up a loop, yarn over and pull through two loops at a time until the end.
1 slst into each back bump of each of the next 6 chains one by one.
1 slst into the next stitch on Round 3
You will repeat the steps from r1 to r8 to create 4 petals. Each petal will use 3 stitches.
Leave a 30cm yarn tail for sewing.
Sew the two sides together (stuff while sewing to make it easier).
Part 3: Stem
Ch 10, skip 2 chains, insert 1 tr in the next ch, 1 dc in the next ch, 3 hdc in the next 3 chs, and 3 sc in the last 3 chs.
Cut the yarn, leaving a 10 cm (4 inches) tail for sewing (sew into the seam between the two pieces).
Chain loop attachment: ch x (adjust the number of chains based on your desired length), then sew it onto the pieces and you’re done!!!
*Pattern Use & Copyright
- This pattern is for personal use only. Do not redistribute or resell.
- You may sell finished products made from this pattern but please credit the designer.
Stay updated
don’t miss out! sign up for our newsletter and be the first to know about our latest posts and exciting projects.
Stay updated
don’t miss out! sign up for our newsletter and be the first to know about our latest posts and exciting projects.
4. Video tutorial
I always look forward to seeing your crochet creations when you try any of my patterns or follow my tutorials.
Please tag me @mincrochets or use the hashtag #mincrochets so i can admire and share your beautiful work!

related projects
Tutorials home – tutorials Cute&easy crochet hanging plant pot | room decor tutorial (nature-themed tutorials)…